Adventures in Dangerous Art: How to Design Stained Glass Lampshades
I'm learning the art (or is it a craft?) of stained glass. At this weblog, I record progress, note useful links, and document flesh wounds.


Links

The Art League
Where I took a lead class and a 3D construction class.

Weisser Glass Studio
Where I buy supplies, and where I took a foil class.

Virginia Stained Glass Co.
Where I buy supplies if I happen to be in Springfield and if they happen to have what I want.

Warner-Crivellaro
Great prices on supplies, a lively and helpful Glass Chat message board, and excellent Technical Tips on stained glass tools and techniques.

Glass Galleries Links List
A list of Glass Chat users who've uploaded photos of their work.

The StoreFinder: Stained Glass Store Front
Lots of articles.

ArtGlassArt.com Tutorials
Even more articles. Particularly recommended: "Anatomy of a design" and "Wood frames."

rec.crafts.glass
Courtesy of Google Groups.

Nancy's Beginner Tips and Tricks
Scoring, breaking, soldering, finishing, and more.

Splinter Removal Tips
Crucial.

Syndicate this site
Someone out there is using XML for something... right?

Movable Type
Powered by.

Archives

It's a glass cutter.
Karal.com seemed to disappear from the internet very shortly after I linked to its page of instructions on drawing glass lampshade plans, on February 9, 2003.

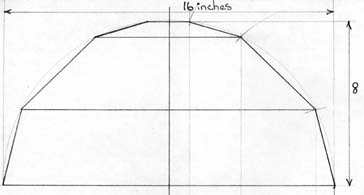
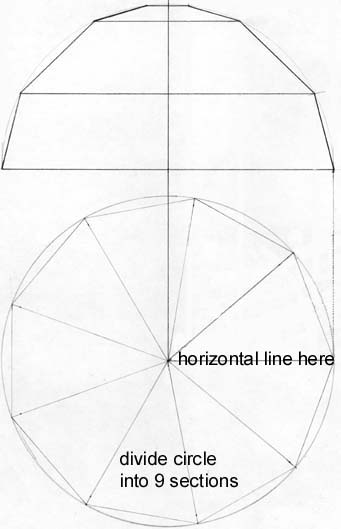
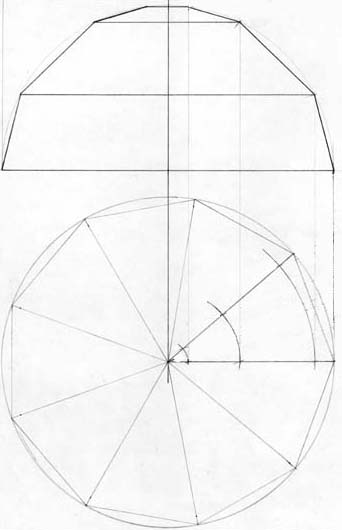
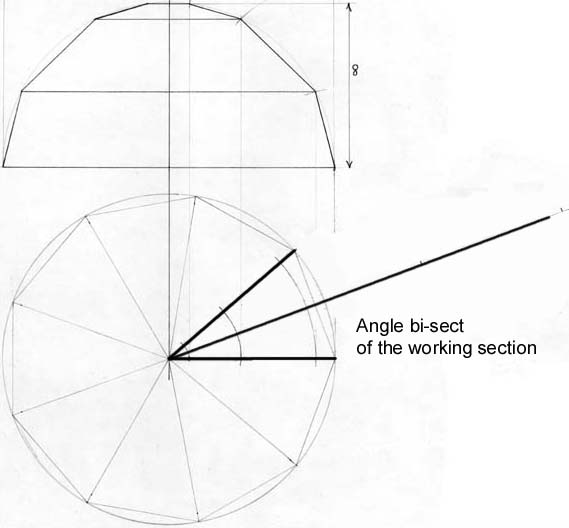
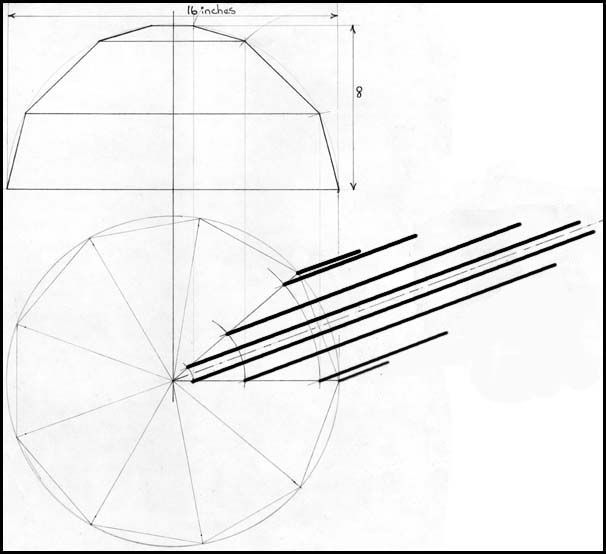
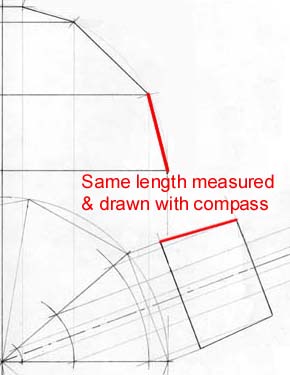
I had saved a local copy as one continuous document, instead of one page and many linked images, so that I could print it out.

Because the original site featured a 'copy freely' policy and because I found the page extremely useful, I'm reproducing it here, with just the formatting change mentioned above.

NOTE 4/20/2006: I just received an email from the author of the glass lampshade drawing page, saying that his old domain had been hijacked by some slimy spammer types and that he's back online at a new address. You can find the original of this document at the new site. The rest of the site looks worth a browse too, and if nothing else, is more likely to be updated than mine (working on two years over here: Adventures in Dangerous Art is now more museum than website).

How to design stained glass lampshades
Karal Studio
How to design stained glass lampshades

    This technique of stained glass lampshade design requires no calculation tables, math's or angle calculations.

With it you can design stained glass lampshades of any spherical regular shape providing your drawing is accurate and done with a sharp pencil..!!!!
The lampshade may have any number of panel sides and any number of layers you desire.

It is done with paper & pencil and applies basic tech. drawing skills only.
You'll need paper, a sharp hard pencil, a ruler, a T-square, 45 degree set square, protractor and compass.

I usually draw so that one centimeter on the drawing equates to one inch on the finished lampshade!!
This way, the drawing is of good size on paper and easily converts to larger scale for template creation.


  • Prepare a clean sheet of A3 paper orientated to landscape & tape it onto a good square edged drawing board.
  • On the upper left of the paper, design your lampshade. Start by drawing a side elevation of the design profile for the lampshade you are wanting to build.
  • Illustrated here is a 3 layered lampshade that has 9 sides. It's overall dimensions is 16 by 8 inches.


  • Now below this design drawing, draw in a circle. It must be the same diameter and be aligned with the side elevation drawing. Now draw in a radius line from the circle's centre to the right hand edge of the plan drawing.
  • Choose the number of sides you wish the lampshade to have (in this example we are going to have 9 sides so it's 360 divided by 9 = 40 degrees) and draw in the radial lines that divides the circle into 9 sections.


  • Draw vertical lines from the side elevation down to the horizontal line on the right side of the plan drawing. Then with a compass draw arc's that intersect this horizontal to the next section above.


  • Now you'll need to draw in an angle bisection into the working section.


  • Next draw parallel lines to the bisection line you've just drawn from each of the intersections you'll find on the working sections. These lines create the widths for your templates.


    Observe closely what is seen here and you will understand how this gives the widths you require for each template.
  • Next draw in a line perpendicular to these parallel lines. This line joins the widest two parallel lines. Now with your compass measure the length of the largest template shape's side and draw it so that it intersects the next smallest parallel line. Draw in another square line on far end then close shape with a 4th side drawn in.


  • Duplicate this action until all of the shapes are drawn and defined.
  • Lastly, measure accurately with a ruler the lengths and widths you now have for each template shape. Measure as centimeters but create the templates in inches. These shapes are then drawn with precision onto a light cardboard then cut out to create your finial templates for cutting the stained glass with.
    Below is the full tech. drawing of the procedure.
Providing you draw and measure with total accuracy and your templates are also made with great care, this technique will enable you to design any regular geometric stained glass lampshade you wish to create.
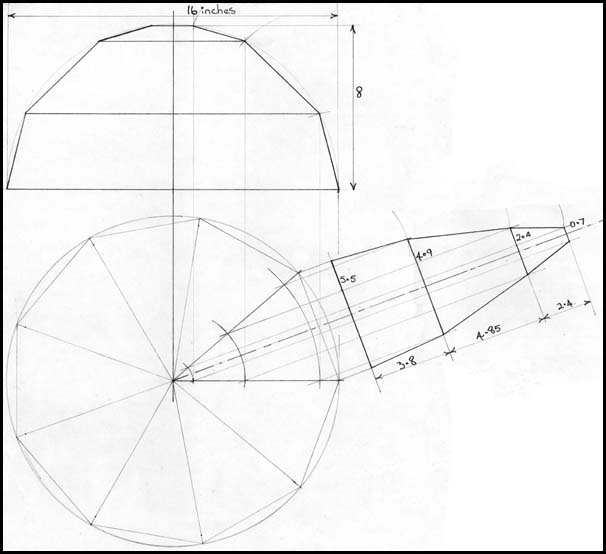
How to design stained glass lampshades drawing
COOL A??!! :-)
Copy freely material
www.karal.com
 
Copyright © 2002-06 Michelle Kinsey Bruns. E-mail me at my first name at this domain. (Take that, spam spiders!)